How to Soundproof a Room for YouTube on a Budget: Studio Acoustics Guide (2026)
Every creator has experienced the painful realization that buying a $400 professional studio microphone does not automatically guarantee professional audio. In fact, upgrading to a high-sensitivity condenser microphone or a broadcast dynamic mic often makes your audio sound noticeably worse. Highly sensitive capsules capture the harsh reality of untreated residential spaces: the hollow flutter echo bouncing between parallel drywall, the muffled hum of an HVAC compressor through the window, the rattle of computer fan vibration on a hollow desk, and the ambient traffic rumbles leaking under your bedroom door.
Desperate for a quick fix, creators frequently turn to online marketplaces and order packs of thin, one-inch polyurethane foam squares or resort to internet myths like sticking cardboard egg cartons to the wall. Six hours of adhesive taping later, their room looks like an industrial packing crate, yet passing sirens still bleed into their recording and their voice sounds thin and boxy. In this definitive 2026 acoustics guide, we demystify the critical physics distinction between Sound Isolation (blocking external noise) and Acoustic Treatment (absorbing internal reflections), analyze the Noise Reduction Coefficient (NRC) of budget materials, and provide a battle-tested DIY roadmap to achieve professional broadcast acoustics under a $150 budget.
Key Takeaways: The Creator Acoustics Framework
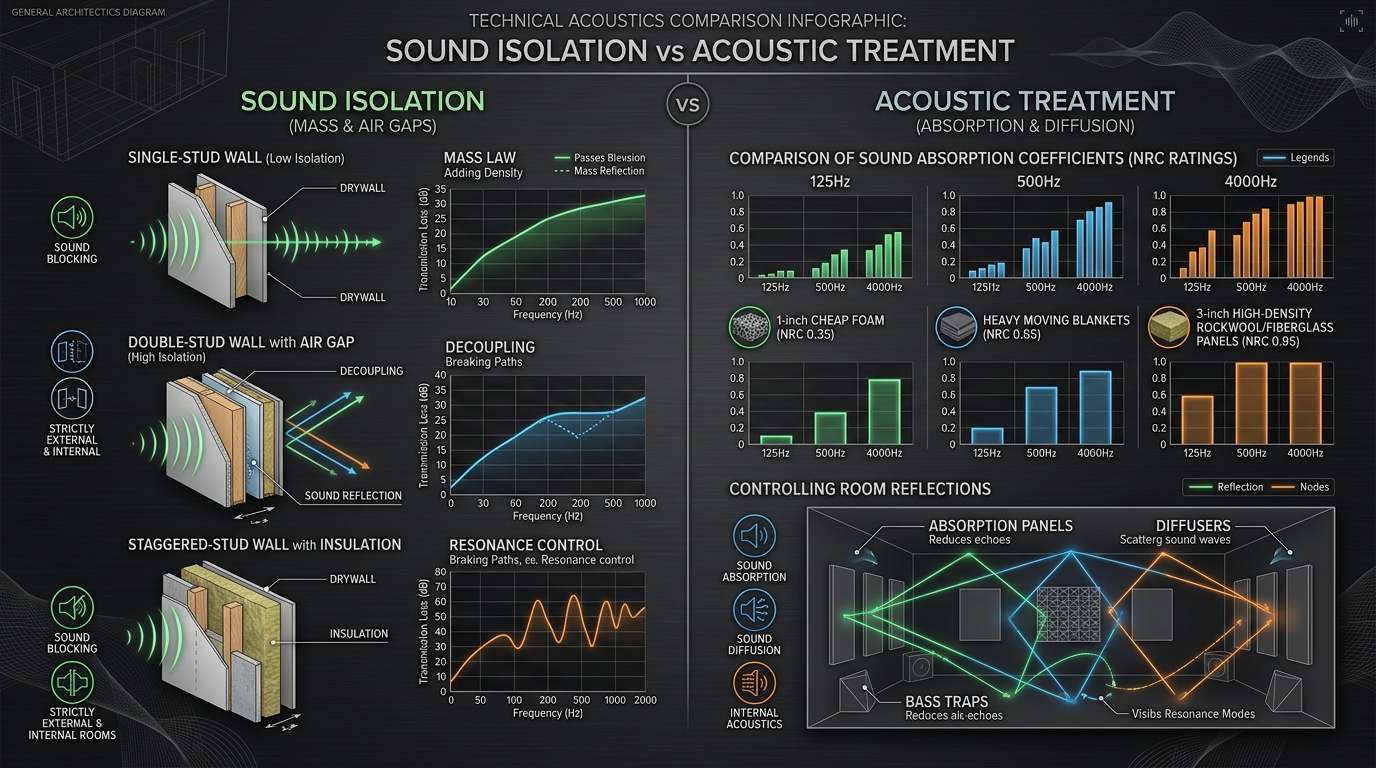
- Soundproofing ≠ Acoustic Treatment: Soundproofing (Isolation) stops sound from entering or leaving a room; it requires physical mass (dense drywall, decoupled studs, airtight seals). Acoustic Treatment (Absorption) controls reflections inside the room to eliminate slapback echo and hollow boxiness.
- Thin Foam is an Acoustic Trap: Standard 1-inch cheap polyurethane foam only absorbs ultra-high frequencies above 4,000 Hz, leaving muddy mid-range vocal reflections (300 Hz to 1,000 Hz) completely untouched. This creates an unnaturally dark, boomy vocal capture.
- Air Leaks Destroy Isolation: Sound travels through air gaps like water through a leaky bucket. A 1% air gap underneath your door reduces a wall’s sound-blocking efficacy by up to 60%. Sealing perimeter gaps with weatherstripping yields the highest ROI.
- The Heavy Moving Blanket Secret: Dense multi-ply padded moving blankets (7 to 8 lbs per dozen) have an NRC rating of 0.65 to 0.70, outperforming cheap acoustic foam at a fraction of the cost.
- DIY Rockwool Panels (The Pro Standard): Building wooden frames packed with 3-inch Rockwool Safe’n’Sound or Owens Corning 703 rigid fiberglass delivers true broad-spectrum absorption (NRC 0.95+) from 250 Hz all the way to 10 kHz.
The Core Physics: Sound Isolation vs. Acoustic Treatment
To invest your budget effectively, you must understand the two fundamentally different acoustic challenges every home studio faces:
| Category | Sound Isolation (Soundproofing) | Acoustic Treatment (Absorption) |
|---|---|---|
| Primary Goal | Stop outside noise from entering (and your voice from escaping). | Eliminate internal flutter echo, comb filtering, and room resonance. |
| Target Noises | Traffic, airplanes, barking dogs, loud roommates, lawnmowers. | Hollow slapback echo, boxy vocal resonance, reverberation. |
| Required Physics | Heavy Mass, Decoupling, Airtight Seals. | Porous Friction, Density, Air Gaps. |
| Budget Reality | Expensive ($2,000+ for true room-in-a-room isolation). | Highly Affordable ($50 to $150 for 90% echo elimination). |
Most YouTube creators who complain that their room “isn’t soundproofed” do not actually need commercial architectural soundproofing. Unless you live adjacent to a subway line or record in a drum shed, 80% of perceived recording flaws stem from untreated internal room reflections. When your voice bounces off bare walls and re-enters the microphone milliseconds later, it creates destructive phase interference known as comb filtering, making your voice sound hollow, distant, and cheap.
The Truth About Acoustic Foam (The NRC Breakdown)
In acoustics, a material’s absorption performance is quantified by its Noise Reduction Coefficient (NRC), ranging from 0.0 (total reflection, like polished marble) to 1.0 (100% absorption, like an open window). A material with an NRC of 0.80 absorbs 80% of sound energy across octave bands.
The problem with budget 1-inch wedge or egg-crate polyurethane foam is that sound absorption is governed by material density and thickness relative to sound wavelength. Low-mid vocal frequencies (such as a male chest voice around 250 Hz) have acoustic wavelengths spanning over 4.5 feet (1.37 meters). A flimsy 1-inch foam tile cannot mechanically slow down a 4.5-foot pressure wave.
| Material & Thickness | 125 Hz (Sub/Bass) | 500 Hz (Vocal Mids) | 2,000 Hz (Speech Presence) | Overall NRC Rating |
|---|---|---|---|---|
| 1-inch Cheap Polyurethane Foam | 0.08 (Useless) | 0.25 (Very Weak) | 0.70 | 0.35 (Poor) |
| Heavy Moving Blankets (Padded) | 0.15 | 0.65 (Effective) | 0.85 | 0.65 (Good) |
| 3-inch Rockwool Safe’n’Sound Panels | 0.52 (Bass Control) | 1.00 (Flawless) | 1.00 | 0.95+ (Master Studio) |
When you coat your walls in 1-inch foam, it eats all the high frequencies (sibilance and air) while doing nothing to stop mid-range boxiness. Your room ends up sounding dull, muffled, and claustrophobic. True acoustic control requires dense fibrous material with real physical mass.
Phase 1: Sealing Perimeter Air Leaks (High-Impact Isolation)
If external noises (hallway footsteps, traffic, living room conversations) are creeping into your recordings, the first line of defense is not covering the walls—it is hermetically sealing the door and window perimeters.
1. The Door Perimeter & Threshold
Most interior residential doors are hollow-core wood with a 0.5-inch to 1-inch gap at the floor. Sound waves leak directly through this perimeter opening.
- Heavy Duty Under-Door Draft Stopper ($15): Install a double-sided silicone or dense rubber sweep that physically seals against the floor when the door closes.
- Self-Adhesive D-Shape EPDM Weatherstripping ($12): Line the door jamb (top, left, and right stops). When you latch the door, the weatherstripping should compress slightly, forming an airtight rubber gasket.
2. The Window Treatment
Standard double-pane or single-pane glass vibrates readily in response to street noise and lawnmowers.
- Hang Heavy Thermal Blackout / Velvet Curtains ($35). Ensure they extend at least 6 inches past the window frame on all sides and reach the floor. The dense woven fabric dampens high-frequency street noise and eliminates flutter echo off the glass.
Phase 2: Controlling Internal Room Reflections (The Mirror Trick)
You do not need to cover 100% of your walls to eliminate echo. Treating just 20% to 30% of total surface area at strategic acoustic reflection points will transform your audio.
How to Find First Reflection Points (The Mirror Trick):
- Sit in your recording chair facing your desk and microphone.
- Have a friend hold a small hand mirror flat against the wall at your head height and slide it along the side wall.
- Look into the mirror from your sitting position. The exact moment you can see your studio monitors or your microphone in the mirror, mark that spot with pencil tape.
- That is your Primary Lateral Reflection Point. Sound travels in straight lines like light; whatever reflects off that point bounces directly back into your microphone.
- Mount an acoustic panel centered on that marker. Repeat for the opposite side wall and the ceiling directly above your head (the “acoustic cloud”).
Treating the Wall Directly Behind Your Head
When you speak into a directional microphone (cardioid pattern), your voice travels forward, past your mic, hits the back wall behind your computer monitor, bounces back, and enters the front of the capsule. Even more critically, the wall directly behind your head reflects sound into the rear of your microphone. Placing two dense absorption panels on the wall directly facing your back eliminates slapback flutter instantly.
Phase 3: The Floor and Desk Boundary Reflections
Hard surfaces directly beneath your mouth produce the most noticeable comb-filtering artifacts in YouTube voiceovers.
1. Hollow Desktops
Large laminated pressboard desks act as acoustic amplifiers. Sound bouncing off your computer desk arrives at your microphone just 2 milliseconds after your direct voice, causing hollow, phasey cancellations.
- Use an Extra-Large Felt or Neoprene Desk Mat ($20). Covering the reflective area between your keyboard and microphone softens high-frequency bounces.
2. Hardwood or Tile Flooring
- Lay down a High-Pile Shag Rug ($40) beneath your recording chair and desk. Place a dense 0.5-inch felt or rubber rug pad underneath to provide low-mid absorption.
Budget Acoustic Tiers: $50 vs. $150 vs. $400
| Budget Tier | Recommended Acoustic Setup | Performance Outcome |
|---|---|---|
| Tier 1: Under $50 (The Scrappy Setup) | Door weatherstripping ($12) + 2 heavy padded moving blankets hung on C-stands or hooks ($28) + thick floor rug. | Eliminates 75% of room flutter echo. Perfect for beginners and dorm rooms. |
| Tier 2: Under $150 (The Creator Sweet Spot) | Door seal kit ($25) + Heavy velvet blackout curtains ($35) + 6 DIY 2-inch dense Rockwool panels with pine frames ($90). | True broadcast vocal booth quality. Clean, warm, radio-grade audio. |
| Tier 3: $400+ (Semi-Pro Home Studio) | Pre-built Primacoustic or GIK Acoustics 244 Bass Traps in corners + 4-inch wall panels + ceiling acoustic cloud. | Flawless linear frequency response across sub-bass and vocal ranges. |
Frequently Asked Questions (FAQ)
Do cardboard egg cartons soundproof a room?
No. This is one of the most persistent and dangerous myths in audio production. Egg cartons are made of ultra-light pressed paper pulp with zero density. They possess virtually no mass (cannot block outside sound) and have an NRC rating near 0.15 (cannot absorb speech frequencies). Worse, untreated cardboard is an extreme fire hazard and collects dust mites. Never use egg cartons in an audio space.
Will a portable reflection shield / vocal isolation booth fix my echo?
Portable curved microphone reflection shields (mounted behind the mic) provide very limited benefit. Cardioid microphones are designed to reject sound from behind the capsule; they are most sensitive to sound entering the front. A reflection shield does nothing to stop sound from bouncing off the wall behind your head and entering the front of the mic. Hanging a heavy blanket behind your chair will deliver five times better results than a $100 reflection shield.
Can acoustic foam damage my apartment walls when removed?
Yes. The cheap double-sided adhesive tape often bundled with budget acoustic foam strips drywall paper and paint upon removal. If you live in a rental apartment, mount your acoustic panels or moving blankets using heavy-duty Command Picture Hanging Strips or hang them from a lightweight garment rack or pipe stand that requires zero wall punctures.
What is the difference between open-cell and closed-cell foam?
In acoustics, you must always use open-cell foam or fibrous mineral wool. Open-cell structures allow air pressure waves to penetrate into the material, where frictional resistance converts acoustic sound energy into minute thermal heat. Closed-cell foam (like packing foam, styrofoam, or yoga mats) forms an impenetrable barrier that reflects sound waves back into the room, aggravating flutter echo.
Why are corner bass traps necessary for voiceover recording?
Low-frequency sound waves (below 200 Hz) are omnidirectional and pool naturally in the 90-degree corners where walls intersect. As bass energy reflects out of corners, it creates localized acoustic peaks and nulls (standing waves) that cause random vocal words to sound boomy or unnaturally resonant. Installing dense triangular corner bass traps tames this low-end buildup, giving spoken dialogue a tight, punchy broadcast character.